• Category Archives In Progress
  • Quick review of the Stealth Arms Phantom Jig

    This is awesome! 1911 receiver completed!

    http://stealtharms.net/1911-phantom-jig/

    I grabbed a kit from Stealth arms with a tactical 80% 1911.  After a bit of learning I made a 100% 1911 frame in about 2 and half hours with only a bench mounted vise and a drill press.  Still have to get all the parts and assemble but the work on the frame is done except for some final cleanup for finish.  The frame is a beautiful machine aluminum.   I’m thinking a bit of Cerakote to finish it off.
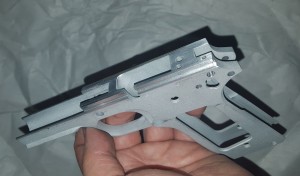
    Stealth Arms 1911 frame after using their jigs to finish it into a 100% receiver
    Stealth Arms 1911 frame after using their jigs to finish it into a 100% receiver


    I used a new old-stock para slide  from Sarco to test fit.  The serration on this slide feel about right for the tactical frame.  I think this will be the slide I use with an inexpensive .45 barrel I got from Midway USA.

    Para Black Ops slide fits right on the Stealth Arms receiver
    Para Black Ops slide fits right on the Stealth Arms receiver


    Next is fitting a beaver tail safety.

    Things I learned:

    • You need a very sturdy work bench.  Mine wiggles a bit too much.
    • Get soft jaws for your vise.  I marred the jig a bit.
    • I suggest removing the other unused cutter while working.  One of mine slipped out and bit the jig pretty hard.
    • Monitor the Cutter allen screw tension.  If it gets loose, the cutter heads can extend out when not desired.
    • Suggest getting a Rail file to remove any chatter marks you may have.
    • Barrel seat cut was a bit rough with chatter marks.  Needed filing and sanding.   In the future I will try milling for a ramped barrel.

    I will buy a couple more frames!  And I will also try a Steel Frame I have from Tactical Machine http://www.tacticalmachining.com/80-products/80-1911.html

    If that works, I may even try an expensive stainless frame from http://1911builders.com/collections/frames


    More to come as this things gets finished up.

    -Rob


  • Parts Fitted on a couple of BeltFeds

    First off, I was wrong.  Old Moonbeam vetoed the AW Ban bill.  So my panicked change of builds was unwarranted.  Nonetheless, it has been a great month or so pushing me to build a few things.  The top of the cool list finding a reasonably priced set of HK21 parts.  I spent a couple of days folding a G3 flat and fitting it all together.  Snapped a pic next to my M60 project.

    Couple of Beltfeds just fitted together.  HK21 and M60 both in 7.62 NATO.
    Couple of Beltfeds just fitted together. HK21 and M60 both in 7.62 NATO.

    Looks like I will hold off welding it for a while now.  Honestly I need to practice welding on some cheaper kits.  Luckily I have a few lying around.  I think I will start folding some more HK flats next.

    And I cleaned my table 🙂

    -Rob


  • Summer 2013 Builds: Semi M60 and more

    With new anti Second Amendment legislation in California, I need to get some of my parts kits into rifles before SB 374 goes into affect.  Here are few kits that have been in the works this summer.

    Things that California SB 374 made me do
    Things that California SB 374 made me do

    The Semi Auto M60 machine gun is one Hell of a heavy Pig.  love it.  And a few AKs and an HK53 pistol.   I have lots more kits I need to give receivers to by January 1st 2014.    Looks like I need to clean an oil my patio table too!


  • Change of Direction

    Over the last few months I have has some major setbacks on the BMP-11 project.  I printed the pistol grip area with partial success.

    Solidoodle prototype print of the BPM11 (lower middle section)
    Solidoodle prototype print of the BPM-11 (lower middle section)

    There was horrible warping and some poorly adhered layers causing the part to be pretty fragile.  The trigger guard broke with just a bit on handling.  This was printed with 80% infill and took 22 hours to print.  It did prove that a shape can be printed with success and I was starting to think I would have to cast the parts.  I also let a number of people hold the part and the conclusion was the grip was not comfortable.

    I then redesigned the 3d model to have a thinner grip and more room for the web of your hand.

    3D Design of the BMP-11 version 8_04
    3D Design of the BMP-11 version 8_04

    At this point I gave up for now.  I started reading up on California SB374, the new Assault Weapon Ban and decided to put this project on hold.  It turns out the new ban will not affect M11 type guns, but I have dozens of other kits that will need to get finished by Jan 2014.  I can get back to the BPM-11 at a later time.

    -Rob


  • UZI PISTOL REWELD

    This pistol build started when I found a demilled police confiscated Uzi Pistol more than 2 years ago online.  This is a compleltly legal to own chunk of scrap metal, it is not a gun.  I left it in a box for a while and pretty much forgot about it.

    UziPistolChoppedup_Thrash
    Cops Throw Away The Coolest Stuff!


    That is until last weekend!  I did a hackjob of welding it together and here it is in the rough.  Now it is a legal to own semi automatic pistol.  Still  needs some cleanup but what I have here is probably the only legal to own uzi pistol that is not a California designated “Assault Rifle.”  The reason is, This gun was not made by Isreal Military Industries, Instead its a Katzbalger Arms UZIP!  Hope to clean it up, engrave a new serial number, test fire it,  and paint it all pretty by the end of the month.  My welding skills are a little substandard, but this was good practice!  No jigs, just used a chunk of copper and vise gripped it together.  Used a cheap Everlast TIG for the welding.

    ThrashUziPistolRough
    Rough Reweld Complete for a new legal “UZI type” Pistol

    -Rob


  • M11/9mm receivers come to life

    Getting Ready To Weld

    m11PartsForBPM11
    2 Sets of Receivers being born for the BPM11/9mm


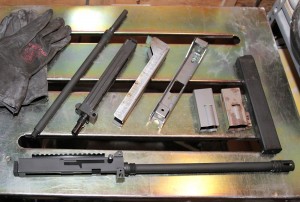
    What I have here is a couple of m-11/9mm flats I bent ready to become working receivers.  I have 2 sets of parts to start to work with, an old cobray marked set and a newer designed modern set.  Next step, clean up receiver number 2 and then some welding.  Unfortunately the sidecocking upper has to go, and will be swapped for a traditional top cocker.    The bent receiver flats are pretty rough, but who cares, they will be inside a chassis!  When this step is done, I can exact dimensions for the BPM11/9mm plastic 3d printed chassis to go around it.

    I was dealt a setback on my 3d printer.  I broke the extruder and have been waiting for a replacement part.  Hopefully it will show up soon.  I want to start printing parts.  🙂


  • Rough 3D model of the BPM-11/9mm

    BPM11_v07_3d_v17
    3d Polygon model of the Katzbalger Arms BMP11/9mm

    Mock-up in 3d started of my BPM-11/9mm chassis project.  Unfortunately I don’t have really nice 3d engineering software, so I am working with what I know, Autodesk 3Dsmax.  I am modeling with polygons instead of splines which is probably not the cleanest.  Still need to work out the joints and cavity shape for the M-11 as well as the charging handle interior.  Lots more to do, but it’s getting to the point that I can start printing parts for test fitting.  🙂


  • Project BPM-11

    My version of a bullpup rifle made from a m-11 pistol parts set begins!

    I have started working on something that may be a relatively easy and fun build.  A bullpup plastic chassis for a 9mm m-11.  Here is the 2d mockup of the BPM-11 from Katzbalger Arms!

    BPM11_v07_Small
    Working Illustration of the Katzbalger Arms BPM11/9mm

    Goals:
    Use readily available m-11 parts and sten mags
    Build the plastic chassis with a inexpensive ABS plastic 3d printer http://www.solidoodle.com/
    I intend to build it in 8″ long sections and glue them together
    If heat proves to be a problem for the ABS I can try casting stronger plastics using the ABS blank
    Frame will remain steel and will be bent from a flat
    Some welding required
    Could be made from a standard m-11 receiver with sight removed
    The overall size is to be slightly larger than a FN p90 (I find it just a bit to short to be comfortable)

    Before I get too far, I would be glad to hear people opinions.
    Next step is to design in 3D.  I already have all the m-11 parts on hand, just need to weld my lower up.

    -Rob